
For those new to snowboarding, your snowboard stance when strapped in might not feel normal just yet. It takes time to build up the muscle memory, just keep in mind, your stance shouldn’t cause strain or pain. When you’re in your athletic stance position, you should be relaxed, but feel in control.
There are three basic factors you need to consider when you are adjusting your snowboard stance: stance width, stance angles, and stance setback.
Each person’s ideal snowboard stance is going to vary slightly, so it’s essential to experiment to see what fits you and your style the best. The goal is to achieve a stance that is comfortable but also allows you to perform your best. So, whether you’re a beginner or a more seasoned rider, it’s worth taking the time getting these three factors dialed in and finding that sweet spot.
This article will show you how to set up your bindings and find what works best for you. Getting your set up right should make a significant difference in your advancement and enjoyment on the mountain.
Snowboard season is upon us so grab a tape measure, a screwdriver, and let’s dive into setting up your new board.
In addition to this article, if you’d like more information about snowboard bindings then be sure to check out How to Choose Snowboard Bindings after you learn how to set up your stance.
Snowboard Stance Width
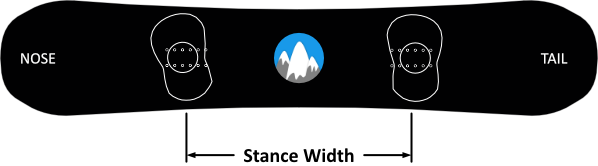
Let’s start by defining what snowboard stance width is. Stance width is the distance between the centers of your bindings and determines how far apart your boots are when you’re strapped in. Depending on your height, the width should be approximately the distance from the center of the kneecap to the floor or roughly 1 inch more than the width of your shoulders.
If you’re a novice, a good place to start is to have your feet closer to shoulder-width apart. Now, if you’ve selected the correct board for your height, the starting stance width should be close to the distance between the default holes on the snowboard.
As you build more confidence, you will realize that stance width is a matter of personal choice. This may drive you to experiment with your width based on your style of riding, for comfort, or the terrain.
Freestyle riders that spend most of their time performing tricks or jumps often set their bindings closer, making it easier to stay centered, hold turns and to keep spins tight.
In comparison, freeriders often widen their stance, helping them stay low for improved steadiness in deeper powder.
How to measure snowboard stance width
Snowboard stance width is measured from the center of the front binding mounting disk to the center of the back binding mounting disk.
To find your general stance width, start by measuring the length up from your heel to the center of the kneecap. The number should be marginally larger than the width from shoulder to shoulder.
Now, if you decide to go wider, push your stance out by 1/2 inch increments each time you ride and see what changes you feel. You’ll definitely know when you’ve gone too far for your comfort level.
Should I use a Snowboard Stance Width Chart?
Since everyone is built differently and has diverse snowboarding styles, it’s challenging to make an exact calculation of how wide your feet should be. A snowboard stance width calculator can help you, but only for a starting reference. For best results, use your measurements, set it up, and then see how it feels.
The best stance width is whatever feels most natural and comfortable.
Wide vs narrow snowboard stance
A wider stance creates a more stable and balanced riding experience. It allows you to go faster when leaning on your front foot.
Also, having your back foot farther back, when doing tricks like ollies, lets you pop higher with more control, and it seems that it makes spinning on the ground more fluid. Not sure what an Ollie is? Watch this video.
Conversely, a narrow stance allows for a tighter carve. Still, you can lose some balance in rougher terrain or deep powder.
How wide or narrow your setup, affect your control of the board, and you will notice even the smallest changes that you make, so toy with your stance width in small increments.
Generally speaking:
- Wider stance – more balance and stability, harder turn transitions
- Narrow stance – less stability, easier turn transitions
Don’t be scared to tweak your bindings. Fine-tuning your stance takes several trial runs; pay attention to your performance and adjust accordingly.
Snowboard stance too wide?
Without a doubt, you can go too wide. While personal preference does play a big part here, if your stance is too wide you’ll find it much more difficult to bend your knees correctly. If you find yourself flexing your knees inward when you bend, then your stance is almost certainly too wide.
Remember, everyone has different proportions of legs and joints. One rider may find 25″ wide picture-perfect, but that doesn’t mean it’s necessarily right for you.
I tried out a 25″ width stance once, even though I could technically pull it off, I couldn’t keep my knees bending outward anymore, and it was putting a strain on my knee joints.
How to tell if you’ve gone to wide? Your knees should never bend inwards. They should be always be pushing outwards. So, if you’re too far angled on each foot or too ‘ducked’, your knees will twist to weird angles, increasing your chance of injury.
Tip: Don’t automatically set a super angled and wide stance simply because it’s popular in the park, or your buds are using that stance. You may get injured!
Snowboard Binding Angles
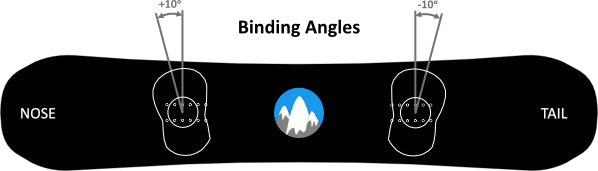
Binding angles are specified by the direction your toes point for each foot while on your snowboard. A positive angle means your front foot is pointed toward the nose of the board, while it’s measured as a negative angle if your back foot is pointed toward the tail. A neutral angle means your toes do not angle toward the nose or tail.
To set your angles up, start by determining your stance width as described in the previous section. Then measure the distance between your feet using a tape measure so you can place the bindings on the board accurately for your stance width. Now, set the bindings on the board and set the mounting disks at zero degrees. Your feet and bindings should face perpendicular to the board.
Popular Angles
Here are a few popular stance angles for beginner riders to try out as starting points:
| Description | Front Foot | Back Foot | Application |
|---|---|---|---|
| Neutral | +15 | 0 | Primarily ride in one direction (no switch riding) |
| Neutral-Duck | +12 | -3 | Mostly ride in one direction but may ride switch occasionally |
| Duck | +10 | -10 | Frequently ride switch and want the board to respond the same in both directions |
Now, rotate the mounting disks to the desired angles. Tighten the bindings to secure in place, tug on each binding to make sure they don’t budge; step into the bindings, and see how it feels.
Fine-tuning
The angles will vary for everyone; modify the binding angles in either direction until you find what works for you. When adjusting your stance it’s best to make small changes of a degree or two rather than to make big changes of something like 5 degrees all at once.
If you’re starting off with duck stance it may feel awkward at first, but should never cause any discomfort to your legs. If you feel a strain in your calves or knees, fine-tune the angles.
As your riding style evolves, you might find these angles are not working for you anymore. If you favor freestyle, for instance, you may choose more symmetrical angles to allow switching directions quickly and to maintain the same riding mechanics in both directions.
Whereas if you prefer freeriding, a perpendicular back foot (neutral) may create more power and stability or even a complete forward stance for more turning force when carving.
The goal when setting your stance angle is to blend what works with your preferred riding style with what feels comfortable. Recommended settings are a starting point, but if for instance, you’re feeling discomfort in your knees, it is time to revisit your settings. Otherwise, over time that strain may lead to unnecessary stress and possible injury to your joints.
Pro Tip: Keep a snowboard tool on you whenever out riding so you can make binding alterations on the fly.
Snowboard Stance Setback
What’s stance setback?
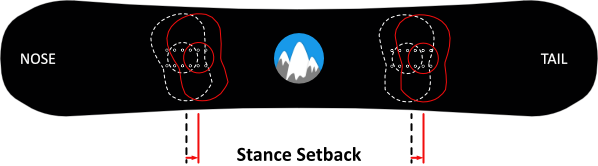
Simply put, stance setback means standing a tad more towards the back of the board, which puts more load on the tail, keeping the nose of your board up and out of the snow.
In deep powder, a great idea, in a park, not so useful. Setback and width are commonly set when you mount your bindings depending on the style of riding, and then you usually leave them be.
Should I use a setback?
Most directional snowboards that are meant to be ridden with a setback have the screw inserts already setback. If this is the case with your board (check with the manufacturer) you ought to put your bindings in the same hole placements for both front and back feet. You shouldn’t usually add extra setback.
However, if you have a true twin snowboard where the screw inserts are symmetrical and you’re going riding in some really soft and deep powder, then maybe tinker with the setback and set your bindings one hole towards the tail.
Simple things to remember about setback:
- Zero stance setback or Centered stance => board will turn easily, and you’ll have better board control.
- Default holes that are typically set backward about 1 inch => the snowboard will act as if it has a stiffer, shorter tail. This allows more aggressive turns, higher ollies, and will float more easily in deeper powder.
- Up to 2-inch setback => this allows you to ride deep powder in a relaxed stance without worrying about your board nosediving into the deep snow, although your snowboard will be harder to turn.
Pro Tip: Setback, at no time, should be a negative (never move binding towards the nose)!
Conclusion
Now that you are familiar with all of the fundamentals of setting up your stance and bindings, it’s time to get on the mountain and start conducting experiments.
Once you have all of these foundations set up exactly how you like them, you are going to get even more gratification from your boarding. We also suggest reading our article about the best snowboard bindings. There are a few valuable tips that will help you fine-tune your stance even more.