There’s a lot more you should expect your snowboard bindings to do for you and your riding that goes well beyond just keeping you attached to your board. With all of the available choices and confusing marketing hype out there, it can be difficult to decide how to choose snowboard bindings.
How to Choose Snowboard Bindings5 Simple Steps:
- 1Determine your Riding Style and Typical Terrain
- 2Decide on a general Flex rating range (soft/medium/stiff)
- 3Pick a Size
- 4Check Compatibility
- 5Decode the Marketer and Understand What’s Really Important
If you’re just looking for the basics regarding how to choose snowboard bindings then you can get into a good pair of snowboard bindings by just following steps 1 – 4.
First you need to figure out your riding style and the typical terrain you plan to ride on. This will drive you toward a general flex rating range (soft/medium/stiff) that you can use to narrow down the choices.
Then you need to pick a size based on your boot size. Finally you need to check to make sure the bindings are compatible with your snowboard attachment system.
So if you’re short on time go ahead and jump to the Riding Style and Terrain (Step 1) section. Then read through the Flex (Step 2) and Size (Step 3) sections within the Performance main section. Finally, check out the Binding Compatibility (Step 4) section. This will give you the basics of how to choose snowboard bindings.
But what’s up with that 5th step you ask?
Ok I confess…the 5th step isn’t so simple. But the 5th step is what really makes this Ultimate Guide useful and different from most of the other information out there on the internet.
If you really want to learn all there is to know about how to choose snowboard bindings then you need to read this whole article or at least bookmark it for future reference when you’re doing your shopping.
This way you’ll be equipped with the full knowledge of how to choose snowboard bindings and you’ll be able to cut through all the marketing hype and understand how to choose snowboard bindings that will meet as many of your needs as possible.
So if you want to know it all then keep reading and I’ll teach you everything you need to know about snowboard bindings in this ultimate guide. If you just want the basics then start with Riding Style and Terrain (Step 1).
Background
Today it should seem obvious to you that bindings are an essential piece of snowboarding equipment. But back in the caveman days, snowboarding evolved from surfing and there were no bindings. You literally just stood on top of the board and tried to ride the snow like an ocean wave.
This works ok if you are riding on powder and you just want to make wide surfy turns. But eventually, snowboarding’s pioneers wanted to push the limits of snowboarding. Initially, they attached a rope to the front of the board as a handle to give a little more control. But this still confined the sport primarily to the hills behind their houses.
In order to push the limits of the sport further and make it more accessible to a wider market, there was a need to keep the board attached to the rider. This was also crucial to make it safe enough for major ski resorts to even consider allowing snowboarding.
That’s the end of the little history lesson. If you would like to learn a little more then check out The Top Ten Important Moments in Snowboarding History.
Considering the history and the progression of the sport I think we can all agree that at a very basic level your snowboard bindings serve a simple purpose which is to keep you on your snowboard.
I’m sure you’re thinking this can’t be all there is to it right?
Of course, there is a lot more your bindings should do for you which can make it difficult to decide how to choose snowboard bindings.
In this article, I’ll focus quite a bit on performance and usability but will also touch on durability, reliability and quality considerations. With these factors in mind, I’ll get into the details of the anatomy of traditional strap-in snowboard bindings, the materials used, and describe what’s different about rear-entry bindings.
Equipping you with this information will help you decide how to choose snowboard bindings and get the most of what you want out of them.
Riding Style and Terrain (Step 1)
When learning how to choose snowboard bindings it is often helpful to keep in mind your preferred riding style and typical terrain. This helps give a frame of reference while considering all of the performance and usability choices available.
There are no official definitions of riding style but the three categories below are used fairly consistently among manufacturers in the industry so they have come to be understood by many riders. They give a helpful way to put riders into three general categories.
Coming up we’ll discuss the flex rating of bindings in detail which is roughly how much the bindings flex and is related to how responsive they may be. As you’ll see flex is a major factor in how these riding style categories have developed.
The goal of learning about how bindings work with your preferred riding style and terrain in mind is to equip you with the knowledge, not only to understand what manufacturers attempt to communicate through their marketing efforts, but also to be able to compare between manufacturers so you can best learn how to choose snowboard bindings that meet your needs.
All Mountain
All mountain is the category that the majority of riders are likely to fall into. It seems to make sense that these are the riders that ride all over the mountain. All mountain riders are likely to spend quite a bit of time on groomed runs but are up for steep un-groomed terrain that may be much more challenging. They may take a few laps trough the park at the end of their runs to try a few rails or to hit a few jumps too. And when the powder day comes they’re all over it.
Since these riders typically do it all they should gravitate toward medium flexing bindings which provide a more balanced response that is compatible with the variety of terrain.
Freestyle/Park
These riders spend most of their time in the park riding rails and hitting various features including small to big jumps. Many freestyle/park riders seem to prefer softer flexing bindings which serves two purposes. First, they allow you to tweak into odd positions to allow you to set up for tricks. Second, they are more forgiving during landings where your body position may be a little out of balance.
Freeride
Freeriders tend to seek out and ride more challenging terrain that is frequently steep and un-groomed that they usually ride at very fast speeds. If there’s powder to be found then these riders are not afraid of a hike to get to it. But along their way down they may hit a range of snow conditions. Given this riding style they may prefer stiffer flexing bindings that provide a quick response that you can depend on during these more critical conditions.
If you’re just looking for the basics then feel free to skip ahead to Flex (Step 2). Otherwise keep reading to get the best understanding of how to choose snowboard bindings.
How do you and your bindings interact?
Before we jump into performance characteristics of snowboard bindings it is helpful to first understand how you and your bindings interact with one another along with getting an idea of your preferred riding style and terrain.
Forces are transmitted from your boots to your bindings only through the components of the bindings that are in contact with your boots including:
- Highback
- Ankle Strap
- Toe Strap
- Footbed
Basically, you should understand that your body transmits forces and energy to your boots, then to your bindings, and finally to the board. The opposite also occurs as feedback is felt in your body based on the terrain your snowboard interacts with.
These are the areas to focus on when thinking about the interaction between your boots and your bindings. But this is only part of the picture.
The components listed above are all in contact with the base of the binding. They transmit energy and forces to the binding base which then transmits these to the attachment system and through the screws to the screw inserts and finally to the board itself.
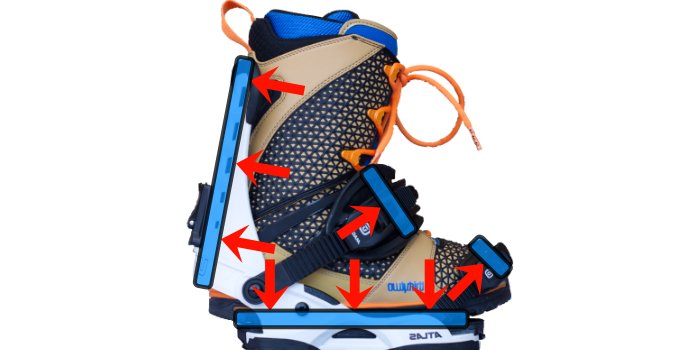
In Figure 1 below the blue rectangles overlaid on the photo represent the contact points of your boot to the binding components and the red arrows are the direction of the forces during various movements.

Figure 1: Binding-Boot Force Interactions
For example, as you lean back for heel side turns the back of your boot interacts with the highback. Your toes also pull up on the toe strap on the toe side edge. When you jump or Ollie the top of the boot is pulling the binding up at the binding straps. As you press down on your toes or heels the energy is being transmitted to the footbed to the binding base and then through to the board.
Understanding this interaction helps you grasp the important characteristics of a binding that I’ll soon discuss which will further help you decide how to choose snowboard bindings.
Performance
Comparing between manufacturer’s is one of the bigger challenges when considering which bindings are the best for you.
Wait…can’t I just go and check out each manufacturers website and get the information I need?
Browsing the manufacturer’s website may help you get an idea of what performance to expect from that individual pair of bindings. But it’s unlikely this alone will be enough for most of us to choose between different types of bindings and among the various manufacturers. Often the marketing jargon gets in the way of understanding the information and distorts our understanding of what is important from what isn’t.
So what kind of binding characteristics are important and how do they translate into the performance of the binding?
I’ll answer this question among others to help you decide how to choose snowboard bindings. Our goal at Snow Gear Tracker is to equip you with the knowledge to make it easier to compare between styles and brands of snowboard bindings to help you get the performance and usability that you’re after.
I’ll also take a break from time to time and attempt to decode some of the trademarked names and marketing jargon used by some of the more popular manufacturers. I’ll break it down to help you understand the true value of the features and benefits without being influenced by the marketing hype.
So, what are the key performance characteristics that you really need to understand? Let’s start with Flex of course…
Flex (Step 2)
The key performance measure to understand relates to the responsiveness of the binding. The responsiveness is mostly determined by the flex characteristics of the binding components. Flex may be the one performance characteristic used by all of the binding manufacturers to describe the performance of their bindings.
However, in most cases, the term flex should be considered more a term to describe the overall “feel” of a pair of bindings rather than being a scientifically measured performance metric.
A soft flexing binding may be described as being less responsive and providing a more surfy feel when riding. On the other hand, a stiff binding is described as being more responsive. Each extreme has their use and so do all the shades of flex in between those extremes.
It’s important to understand that each manufacturer has their own concept of what that feeling is.
At Snow Gear Tracker we use qualitative words to describe binding flex like soft, medium, and stiff which we feel is truer to the subjective nature of flex descriptions.
Some manufacturers may use a numerical scale to attempt to make it seem more scientific. But the fact is that there are many factors that contribute to the overall stiffness of bindings that are difficult to quantify objectively. There is no internationally recognized test method or meaning for binding “flex”.
You may be able to measure the stiffness of the highback in a lab using sophisticated force measurement equipment. But that is just one component in the overall stiffness of the binding. And unless each manufacturer used the exact same test method, equipment, sample size, and measurement units there is no way to compare those ratings between manufacturers. You would really need an independent laboratory to take the highbacks and run the same test.
So what is flex good for?
The important thing to understand is that flex is more of a feeling and it cannot be used to objectively compare bindings between manufacturers by using the descriptions or numbers on their individual websites.
With that said flex is a useful way to subjectively compare and give you a general idea of what to expect.
Keep all this in mind when reading reviews on the web that are using a complex rating system that may, for example, rate a binding from one manufacturer as a 6 and a binding from another as a 7. Then proceed to conclude that if you like a stiffer binding then for sure the second binding is the clear winner. This is usually garbage!
Remember flex is a feeling and it is subjective. At best we can say the two bindings have a medium flex but it’s likely no one will be able to tell the difference. This is why you won’t find complex rating systems on Snow Gear Tracker. They usually don’t mean all that much.
If you’re just looking for the basics then feel free to skip ahead to Size (Step 3). Otherwise keep reading to get the best understanding of how to choose snowboard bindings.
Cushioning (Damping)
The other response related performance characteristic that you should pay attention to is the cushioning (damping) of the footbed and binding base.
The location, thickness, and type of cushioning will affect the damping characteristics of the bindings. This serves the purpose of absorbing shock from bumps and during landings. But the design of the damping system also plays a role in the responsiveness of the binding and can affect how much your bindings inhibit the natural flex of your snowboard.
Better designed bindings have separate footbeds that are typically removable. These are usually made of EVA Foam Rubber but other materials are sometimes used alone or in combination with EVA as well.
Other bindings do not include separate footbeds. In some cases, the binding bases have a little bit of rubber in strategic locations which provides some cushioning.
Many inexpensive bindings don’t have any cushioning between your boots and the base of the binding which can actually make the base quite responsive. But often these bindings are softer flexing overall since more flexible plastics are used.
In summary, flex and damping are the key specifications to pay attention to in order to understand how responsive the binding is likely to be when ridden.
Weight
In general, weight should not be much of a concern for most riders.
Sure, it is desirable to have the lightest bindings possible. Having lightweight equipment strapped to your feet makes you nimbler as you ride. It holds you back less when spinning in the air (something only top athletes may notice).
So, you could say it should be of concern! But I consider weight to be a design problem that tends to take care of itself and here’s why…
As I described, the primary performance property you’re concerned with when choosing bindings is the flex. Flex is related to the strength of the material. For a given material an engineer will change the amount of flex of a binding component by using less or more material per unit volume. The engineer will only use as much material as needed to achieve the desired stiffness to help keep costs down.
That’s why I consider weight to be more of a result of prioritizing the flex of the binding over other factors.
If the engineers’s goal is to design the lightest binding possible then he’s going to end up using the least amount of material. The trade-off is the binding is going to have a soft flex. There are other factors but in general lighter bindings will be softer flexing and heavier bindings will be stiffer.
You may be thinking that some materials weigh more than others, so the engineer can use a lighter material? Well, it is not quite that simple…
Consider that a large percentage of the weight of bindings is contained in the highback, heelcup, and baseplate of a binding. These components are typically made of Nylon, Glass Fiber Reinforced (GFR) Nylon, or Aluminum Alloys.
Let’s take a look at the key physical and mechanical properties of these materials (refer to Table 1)…
Table 1: Typical Properties of Binding Base and Highback Materials
|
Material |
Density (kg/m3) |
Tensile Strength (J/m3) |
Strength to Weight Ratio (J/kg) |
|---|---|---|---|
|
1140 |
71.8 |
0.06 |
|
|
1380 |
176 |
0.13 |
|
|
2700 |
310 |
0.11 |
If you compare Nylon to GFR Nylon you can see the density (weight of material per unit volume) of the materials are about the same but a typical aluminum alloy is about twice as dense.
Looking at the tensile strength, GFR Nylon is roughly twice as strong as plain Nylon and Aluminum Alloy is roughly twice as strong as GFR Nylon. But from a strength to weight ratio GFR Nylon and Aluminum Alloy are actually quite comparable and both are about double Nylon.
There are other material properties to consider and limitations on minimum section sizes along with manufacturing concerns of components. But in general, weight is an outcome of the engineer dialing in a specific flex.
Nylon is a good choice for engineering a soft flexing binding that will also be very lightweight. A popular example is Union Flite Pro.
But if you want a stiffer binding you are likely to step up to using GFR Nylon or aluminum. An example is the Union Atlas which will weigh a bit more than the Union Flite Pro.
The primary difference is the use of GFR Nylon in the Atlas. But as I showed in Table 1, GFR Nylon is just a little more dense than plain Nylon but quite a bit stiffer.
The Flight Pro does use a little less material in some areas which will reduce weight. But the Atlas is roughly the same size and thickness as the Flite Pro so it will only be marginally heavier while feeling considerably stiffer due to the use of GFR Nylon.
Anyway, as I mentioned only the most elite athletes have the potential to notice the minor weight difference between the top bindings on the market. The weights are not really that different for the reasons I’ve discussed. This is why manufacturers don’t usually boast too much about weight and they don’t list weight numbers because there really is not that much difference between bindings.
So next time you see a review where people are debating about how to choose snowboard bindings based on the weight, you are now equipped with the knowledge to confidently ignore them.
Size (Step 3)
Some bindings are sold as one size fits all. Most higher-end bindings come in sizes that are matched to the size of your boot. In any case, a good first step to determining the correct size is to check the manufacturer’s sizing charts to ensure the binding is compatible with your boot size.
The primary concern is you want your boot to be as centered as possible in the binding.
If you have a large boot and you try to pair it with a size small binding you’re going to get too much hangover in the toe area. You want the ball of your foot to be toward the front of the binding with just your toes hanging over slightly.
If the ball of your foot is hanging over the front of the binding you will not have as much control. It’s also likely your feet will be hanging over the edge of the snowboard which will drag on the snow as you turn which affects your speed. If they are really hanging over quite far your boots can catch and cause falls.
The other situation is if you have a smaller boot. If you put this in a large binding the ball of your foot will be toward the center of the binding which will give you less power and control during toeside turns.
Overall you will not be centered on the board which is the goal. Most bindings offer limited adjustability in terms of centering which makes choosing the right size quite important when deciding how to choose snowboard bindings.
Ultimately, you’ll want to depend on the manufacturer’s size charts as a starting point. But after you get your bindings you’ll want to install them on your board at home. Then adjust them for your boots and confirm that you can get your boots centered on the binding and board.
If you’re just looking for the basics then feel free to skip ahead to Binding Compatibility (Step 4). Otherwise keep reading to get the best understanding of how to choose snowboard bindings.
Usability
Beyond performance, usability is another important concept to think about when learning how to choose snowboard bindings. Among usability considerations you’re going to want to think about:
- How do I put them on and take them off?
- How do they attach to the board?
- How do I set them up?
- How do I adjust them and what tools do I need?
- What features affect comfort?
I’ll discuss usability and answer these questions among others when we start to look at each of the individual binding components.
Quality, Durability, and Reliability
Snowboard gear takes a lot of wear and tear. Some of it while actually on the mountain riding but often quite a bit while thrashing around in the back of your truck or maybe in your roof carrier. Sitting around baking in your 100 °F garage all summer long can also take a toll on plastic materials used in snowboard bindings.
Luckily, you’ll find that the competition between the top binding manufacturer’s is pretty stiff. They can’t really afford to put out low-quality products that are not durable and reliable. This is true at least for the products we recommend at Snow Gear Tracker.
Generally, manufacturers use some very durable materials. But durability is definitely something to keep in mind since your life may be at stake if your binding strap breaks when you’re charging down at 50 mph. Manufacturers may be liable if it is due to a manufacturing or quality problem. So this too helps keep them in line.
Because the stakes can be high, the quality, durability, and reliability of bindings are important considerations as you decide how to choose snowboard bindings. Even if something breaks while you’re waiting in line it is still a pain and can mean the end or at least a delay in your snowboarding day. Resorts don’t give you a refund if you can’t ride due to a screw falling out. And at today’s lift ticket prices who needs that?
Manufacturers have the responsibility to put out quality bindings. But you also need to take responsibility for your own equipment. Make sure it is set up and adjusted properly. You should get in the habit of inspecting your bindings before your trip and at the end or beginning of each riding day.
Materials
With a materials engineering background, I can get excited about discussing materials.
You’re likely not as enthused about materials as I am. But trust me, gaining an understanding of the various materials used can really help you decide how to choose snowboard bindings.
Gaining this understanding is important because manufacturers often tout various materials in their marketing pitches. So if you’re educated on the subject you’ll be better equipped to decide if their message is fact or fluff.
This section is going to be an overview of some of the more common…and a few of the less common…materials that are used in the construction of bindings. When I start talking about individual components I’ll further discuss the various materials that are used.
Let’s get started with plastics since they make up the majority of materials used in the design of most bindings on the market.
Plastics
Our lives are surrounded by plastics, so it should come as no surprise that plastics are used in all bindings. Some bindings are all plastic except for a few metal fasteners and screws here and there. While some substitute other materials to use less overall but I’ve never come across a binding that does not use plastics.
In binding designs, you’ll typically find what materials scientists have categorized as engineering plastics. Engineering plastics are a subgroup of plastic materials considered to have superior mechanical properties to those of more commonly used commodity plastic materials.
These plastics are widely used because they are light, strong, thermally stable, and can be processed using a wide variety of methods. As a bonus, most of these engineering plastics are recyclable which is good news since most are also made from resources such as natural gas, coal, or crude oil.
First I’ll discuss of few of the more important categories of engineering plastics that are used in binding manufacturing.
Nylon (Polyamide)
Nylon is a general name for a family of polymers that are used because they provide great impact resistance and mechanical strength. Nylon is considered a tough material which means it can absorb a lot of energy without failing. Often, you’ll find that nylon is the base material for creating composite materials which we’ll discuss later in this section.
POM (Polyoxymethylene or Acetal)
POM is an engineering plastic that is often used to make precision parts requiring high stiffness, low friction, and excellent dimensional stability. It may also be used as a base material for composites.
Polyurethane (PUR or PU)
Polyurethane is a durable material that provides great impact resistance along with the ability to flex well. It performs in applications where repeated flexing may lead to fatigue and failure in other plastics but the performance advantages of polyurethanes allow them to recover and perform over and over.
EVA (Ethylene-vinyl acetate)
EVA is often referred to as expanded rubber or foam rubber. It has rubber-like properties and is often used as the padding you’ll find on highbacks and footbeds of snowboard bindings. A couple of the special properties that make it well suited to the application of snowboard bindings is that it has a great low-temperature toughness and stress-crack resistance.
Polycarbonate (PC)
Polycarbonate is an engineering plastic which is very strong and tough. It can absorb extreme plastic deformations without cracking or breaking.
Gel (Silicone Rubber)
Silicone Rubber is often referred to as a gel and is a durable material that is effectively used as a shock absorber in snowboard binding footbeds. It is usually used in the form of smaller insert sections in larger areas of EVA foam rubber. It can be formulated to offer varying degrees of stiffness, so manufacturers can vary the response of the cushioning system.
Decoding the Marketer: “Bomb-Proof”
Burton uses polycarbonate in some of their binding baseplates and they refer to the material as, “Bomb-Proof Polycarbonate”. This is probably a reference to the use of polycarbonate in applications such as “bullet-proof glass” windows and police riot and bomb squad gear. While polycarbonate is an exceptional material that can be processed to be very projectile resistant, “bomb-proof” is a marketing exaggeration. There is likely nothing all that extraordinary about the polycarbonate used in Burton’s bindings.
Fiber Reinforced Plastics (FRP)
Fiber Reinforced Plastic (FRP) is a type of composite material made of a plastic matrix and typically reinforced with glass or carbon fibers, but fiber materials such as aramid or basalt are also common.Many binding components are made from plastics manufactured by injection or compression molding. Making the plastic stiffer and stronger can be as simple as adding some chopped up glass fibers to the resin. Although this will make the material stronger it has its limitations. And if you add too much of the reinforcement fiber the material can become brittle.
A side note is that injection molded FRP may be difficult to distinguish visually from regular plastics since the fibers are typically very small. The other common manufacturing method is to weave fibers into a fabric and then impregnate them with an epoxy resin. You can usually identify this type of material since the weave of the fibers is still visible through the transparent resin. This is that woven appearance that you typically see when you look at fiberglass or carbon fiber.This method has been used for many years for producing some of the layers of the snowboard itself. But manufacturers are now using this for the highbacks and even in the footbeds of bindings. It makes for a very light and strong yet flexible component. One of the unique advantages is that fibers of different strength can be used in different directions to create a component that is stiffer in one direction compared to another.
Decoding the Marketer: DuraFlex™
Union Bindings Company use the trademark name DuraFlex™ for their nylon-based composites. The concept of using a nylon-based composite is not unique to Union. There is likely nothing revolutionary compared to other top manufacturers with what they are doing with the material class. Rather they have just given a special name to their particular recipe of FRP.
Metals
Given the higher cost and relatively more challenging processing requirements, metals are used more sparingly than plastics in binding manufacturing. But they certainly have their place as I’ll discuss in this section.
Aluminum Alloys
Aluminum alloys are often used to replace some of the plastics used in snowboard bindings to achieve greater stiffness. They work great because they are stronger and stiffer than many plastics but are relatively lightweight compared to steels. They can be extruded, stamped, cast, and formed into complex shapes.
If left untreated the surface of aluminum alloys will form a white protective layer that provides corrosion resistance. Often, they are treated by a process called anodizing which provides a protective layer and can be produced in many different colors.
Steel
The use of steel in bindings is usually limited to screws, bushings, and other fasteners. The extra strength steel provides compared to other materials is well suited to these fastener applications.
But you won’t find steel used on other components. Usually, aluminum, plastics, and composites are preferred due to their lower weight and flexibility along with being easier to process.
Corrosion resistant steels are more expensive but are necessary as the material of choice for the screws to attach the binding to the board.
Magnesium (Mg)
Magnesium alloys with small amounts of aluminum and zinc can be used to produce lightweight, durable, strong, and impact resistant components.
The use of magnesium alloys has become more feasible over the past couple of decades with advancements in injection molding technology. Injection molded Mg can produce some great properties, but it has not seen widespread use in the binding industry. This is likely because it requires significant investment in equipment that does not have wide applications.
Union Bindings Company began making their ratchets out of injection molded Mg over a decade ago which is a great application. I have not seen other manufacturers using it. While researching, I did come across a Design World Online article from 2011 that showed a picture of binding baseplates made from this material. This shows it can be done but again most likely the upfront investment in the equipment is difficult to justify.
Decoding the Marketer: “Property Class”
Union Bindings Company state that they use only the strongest steel featuring a property class of 8.8 and implying that other brands use “mild steel” with a property class of only 4.6.
What’s up with that?
This one is a bit of a mystery why they would use the term “property class”. They are discussing the strength of the steel, so it is puzzling why they didn’t just say they use steel that is over 90% stronger than the most common steel.
Do they think consumers can’t grasp the concept? Or maybe they just don’t want to give away the exact grade of steel they are using to their competitors?Anyway, they are very likely comparing the ultimate tensile strength of two different steels. Engineers will tell you that specifying a material only based on the tensile strength of a material is a mistake.There are many properties to consider as part of materials selection. Often performance properties are in opposition to one another. For example, a very strong material can fail suddenly in a brittle manner compared to a material that can absorb more energy before it deforms.An extreme example is glass vs plastic. If you try to bend a sheet of glass you won’t get very far before it shatters. Glass is very high strength, but it fails suddenly in a catastrophic manner.
On the other hand, a typical plastic sheet can be bent to some degree with very little degradation. It cannot undergo as much stress as glass, but it can flex and stretch a lot more before failure.Steel properties are somewhere in between glass and plastic. Steel is used in the bushings of ratchets that take a lot of stress and sometimes the stress is applied very suddenly such as during a hard landing. Of course you would not want to use a steel that is so brittle that it fails suddenly.I doubt Union has chosen a steel that has no ability to flex a little before failure. But the point is that stating one “property class” is better than another is usually not the whole picture and it is a source of confusion for the consumer when it is unclear exactly what property they are talking about.
Anatomy of Snowboard Bindings


Highback
Highbacks are one of the foundational pieces of snowboard bindings and play a critical role in energy transfer during heelside turning. So they definitely are something to pay attention to as you’re learning how to choose snowboard bindings.
Basically, as you lean back on your heelside, energy is transmitted from your high ankle and lower calf area to your boots and through to the highback. Without them, you would have very limited control and would not be able to make quick turns.
Highbacks can be found in different shapes and heights. They are also made from several materials including plastics, composites, and aluminum alloys. Material choice along with the structural design of the highback results in varying stiffness levels. This contributes to the overall response of the binding and of course plays a big role during heelside turns.
Often you will find padding attached to the upper part as a cushion. This also acts as a damper between your leg and the highback to further tune in the response. This is usually made of some sort of foam padding such as EVA.
Highback Shape
Among highback shapes, one of the differences you’ll see is at the top of the highback.
Some are rather symmetrical like the Arbor Cypress (Figure 2A). Others like the Burton Mala Vita (Figure 2B) are designed with a small wing on the inside of your calf. This gives a little extra control when tweaking your legs inward for freestyle tricks.
On the other extreme, you have the Flux DSW (Figure 2D) which have a large wing on the outside of the calf. This gives the ability to lean very deeply into presses and butters.
So, there are lots of shapes to choose from that allow you to customize the highback to your riding style.

Figure 2: Various highback shapes, angles, and heights
Highback Angle
If you stand in a snowboarding position you will notice that your legs form an “A” shape. Since your legs angle inward toward the center of the board some manufacturers produce highbacks that are angled inward to match the angle of your legs. An example of the inward angle can be seen on Burton’s Mala Vita (Figure 2B). In contrast, the Arbor Cypress highback (Figure 2A) is more straight up and down.
The goal of angling the highbacks is to have them fit better to the contour of your lower leg. This may help with the response since it is always in contact with your leg during typical turn initiations.
However, with a highback that is not angled a smaller surface area of your leg is contacting the highback and thus slightly slower turn initiations or less control may be expected.
Even with angled highbacks, depending on how loose you wear your bindings and the amount of forward lean, there may still be a little play between your leg and highback and you will have a some movement before the boot starts to contact the binding. The response will be a little slower in this case too.
Highback Rotation
In most designs the highback can be rotated in the heelcup. There are typically three positions. This allows you to adjust them so that they are closer to parallel to the edge of your snowboard. This puts them in a position that is aligned with the direction that the force is being transferred from your legs during turns.
So similar to the angle discussed above it has to do with the positioning of the highback on your lower leg. If it is in a more ideal position, then it will be contacting your boot utilizing a greater surface contact area between your leg and highback resulting in a better response and more efficient energy transfer.
Highback Height
The height of the highback also plays a role in its responsiveness. To visualize the difference take a look back at Figure 2 to view the relative heights of the various highbacks compared to the Flux TT (Figure 2C).
A taller highback is going to be more sensitive to your movements compared to a shorter one. This is because with a taller highback you will get more mechanical leverage. The result for a taller highback is the angle of your snowboard edge will change and dig into the snow with less force than with a shorter highback.
To understand the mechanical leverage that can be achieved think about using a short wrench to turn a bolt vs a longer wrench. It feels much easier to turn the bolt using the longer wrench.
From a physics standpoint, imagine your binding as a simple “L” shape. In Figure 3 below, you can see that when you initiate a heelside turn your boot applies a Force (F) which results in a Torque (T) and causes rotation in the direction of the red circular arrow shown at the pivot point (corner of the blue “L” shape).

Figure 3: Force (Torque) Diagram for Heelside Turns
Imagine if the height (h) of one highback is twice as high as another highback then it will take ½ as much force to produce the same torque. This is because the resultant torque is equal to the force applied multiplied by the height of the highback above the binding base.
Torque (T) = Force (F) x Height (h)
Height is a consideration in the type of riding you’re doing. If you’re a park rider you may prefer a shorter highback, so you can tweak your legs into various positions to set up for tricks or during presses. On the other hand, if you’re into carving on groomed runs you may appreciate a taller highback for less effort and a quick response when alternating between heelside and toe side.
Heelcup
The heelcup is the U-shape piece at the heel of the binding that joins the two sides of the binding base. It provides structural rigidity to the sides of the binding base and supports the highback.
Some bindings have bases that are a single piece including the heelcup. Others have a separate heelcup that is fastened to the two sides of the binding base.
The advantage of a separate heelcup is that it can be made of different materials to alter the stiffness of the binding. For example, a plastic binding base may have a plastic heelcup for a softer flex. If the designer wants to make that binding a little stiffer they may choose to insert a composite or aluminum alloy heelcup to increase the rigidity without the need to alter the rest of the binding base.
From a manufacturing standpoint, it is cheaper to have a one-piece heel cup but there are not as many options for adjusting the stiffness without changing the entire binding base.
One of the other advantages of a separate heel cup is you can adjust the centering of your boot on the board without moving the base of the binding.
This allows you to keep the base of the binding in the ideal location to allow natural board flex while sliding the heel cup in or out to adjust boot centering. Otherwise, you would typically need to adjust this through the attachment system by shifting the binding toward either edge. But this can throw out of balance the flex of the board.
Forward Lean Adjuster
The forward lean adjuster is used to adjust the angle of the highback from vertical (zero forward lean) to more forward lean toward the toes of the board. This affects the binding responsiveness and body position during turns.
Zero forward lean allows a little more play before a heelside turn is initiated and may be desirable for park, freestyle, or if you just like to ride with a more relaxed feel.
More forward lean means that the highback is firmer against your boot even while making toeside turns. So, when you make your move toward a heelside turn there is less delay before the board starts to move. More forward lean may be desirable when carving on groomers or on firmer snow or ice.
There are several different designs that manufacturers use as the method to adjust the forward lean. The most common is a little lever on the back of the highback that you pull out to loosen a fastener. This allows you to move a plastic block up and down. The plastic block contacts the heelcup which adjusts the resting angle of the highback. Push the piece up for less lean and push it down for more lean. Then lock the lever back down.
In some models such as the Burton Cartel, there is a screw with a lever/block that is inserted in between an open hole on the highback. This screw is twisted to separate the two sides of the opening which angles the highback forward.
Another design can be seen in Bent Metal’s bindings where a block is rotated to produce 4 different quick settings. This design is easier to make changes on the fly while strapped into the binding.
Still, other designs allow just micro adjustment by loosening the screws that attach the highback to the base at the pivot point. You can make a few minor adjustments to the angle this way but the options are limited with this design.
Ankle Strap
The ankle strap is the big strap that fits over the top of the ankle area of your boot. It pulls your ankle toward the heel cup and carries the bulk of the responsibility of keeping you attached to your bindings.
In addition to keeping you in the bindings, the design of the ankle strap is also the most important factor in the comfort of your bindings.
As you tighten the strap a lot of pressure is applied across the top of your boot. If this force is not applied evenly then you will feel pressure points and be uncomfortable. Padding is integrated into the strap to distribute the force more evenly across a wider surface area of your boot which minimizes the pressure points.
Decoding the Marketer: Straps
Some newer strap designs use more complex layering of materials in their designs. With these designs often you will have a molded EVA foam that contacts your boot with a stronger plastic housing that overlays the foam.
The theory is this allows the strap components to be molded to the contours of the boot so they can work together to produce strategic pressure applied across the foot in an effort to maximize comfort.Different manufacturers have different marketing names for this strap system including Union’s Exoframe, Burton’s Hammockstrap, and Flux’s Waffle Strap to name a few.One of the benefits that Burton claims on their website is that it offers, “stitch-less construction for ultra-response with minimal materials.” When I hear terms like “stitch-less” and “minimal materials” it leaves me with the impression that this is more of a cost savings tactic.The more traditional design uses padding with fabric including leather stitched over it. Stitching fabric over the padding is something that would be difficult to automate with robotic machinery, so it would most likely be performed by a human.On the other hand, the individual components of the newer designs can be molded and easily assembled which likely uses much less human labor.I guess the ultimate question is are they more comfortable?I’ve ridden both styles. The older design on the Burton Cartel EST and more recently I’m riding Union Atlas. I can’t say they are more comfortable.A lot of the comfort you feel in your foot is quite dependent on the design and fit of your boot. I do think that the molded components of the newer designs provide the opportunity to mold more complex 3D geometries and are likely more consistent from a quality standpoint.So overall while you are unlikely to notice a significant difference in comfort there are some minor potential quality benefits. In terms of durability, you don’t have to worry about the fabric wearing or the stitching coming undone which is a nice bonus.
Toe Strap vs Toe Cap
The toe strap is the strap that holds the front part of your foot on the binding. There are two styles.
One goes across the top of your boot and the other is a cap that fits over the tip of your boot. Many newer designs can be worn either way.
The toe cap is more effective at keeping the front of your foot tightly connected to the front of the binding. If you use a toe cap design, overall you will experience a faster response during turning which is great for carving in firm snow or ice.
On the other hand, you may prefer the other style that goes across the top of your foot if you want a little softer response. This may be preferred for park riding because you can get a little more movement in the binding for tweaking into presses and setting up for tricks or odd landings.
More recent toe strap designs are using some of the newer multi-layer construction similar to ankle straps. But toe straps don’t have as much impact in terms of comfort when compared to ankle straps. So, while they are worthy of consideration in terms of how you will wear them (toe vs top) you should be more concerned with the ankle strap. Since toe straps don’t contribute as much to comfort you will not find much padding on them but don’t let that concern you.
Ladders (Ankle and Toe)
Ladders are the plastic part of the straps that attach to the binding base and are fed into the ratchets to tighten them. They are used on both the ankle and toe straps.
The ladders have steps molded into them that act like gear teeth and mate with those on the ratchet. As you operate the ratchet it steps up the ladder and tightens the binding.
It is very important that these are precisely molded out of strong durable material. If they are poorly designed and manufactured or made from a material without good wear resistance, you will get slippage of the ratchet.
Ladders are one of the components of bindings that is likely to wear over time and is usually not covered by an extended warranty. At some point, the teeth on the ladders become worn and the ratchets slip when you try to get that one extra notch of tightness. This usually is not a safety issue, but you may not be able to get them quite as tight as you like.
Ratchets
As discussed above in the ladders section, ratchets have teeth that mesh with the teeth on the ladders. They tighten down your straps as you ratchet them. Like the ladders, these teeth can wear over time and are not typically covered beyond the initial warranty period.
Some are made of hard plastic while others may be made from metals like aluminum and magnesium alloys. Something to consider is the length of the lever. Longer ones will give you a little more leverage when tightening and they may be easier to get your thumb/finger under when you have gloves on.
Footbed
Footbeds are the part of the binding that the bottom of your boot contacts.
Most newer designs have a removable footbed that fully covers the baseplate and attachment system. Removable footbeds slide in/out and are typically held in place using a single screw.
Lower end designs do not typically have separate footbeds. The cushioning (if any) is built directly into the baseplate.
For my money, models with removable footbeds are preferred. The shoes you’re wearing probably have insoles to make them more comfortable. So why not your bindings too?
You may think of removable footbeds like an insole for your bindings. Designs with removable footbeds will usually have superior cushioning and shock dampening characteristics.
Possibly one of the more understated benefits of removable, full coverage footbeds is they keep snow from accumulating and icing up the disk attachment system and screws.
I’ve ridden bindings without this feature and I find that as the ice builds up and you end up with a little ice mound in the middle of the binding that protrudes into the sole of your boot.
This makes the bindings less comfortable and power transfer is no longer optimized. This also affects the tightness of your bindings. If you’re standing on a little mound of ice you will need the straps just a little looser than normal to ensure they are not too tight. Once it gets really iced up you usually need to chip it off with a screwdriver.
In designs without removable footbeds, you may be standing right on the baseplate. In some cases, there may be some cushioning included in just the foot and heel of the baseplate which is a slight improvement.
Some designs without the removable footbed may have a small plastic cover that goes over the disk/screws. This is of great benefit in keeping the icy mound from forming in this area.
Another nice feature to look for in footbeds is “canting” which is a built-in ergonomic angle in the footbed for better positioning of your ankles, knees and overall stance which also helps optimize power transfer to the board. Canting may be implemented through the binding base but when it is implemented through the footbed it is usually accomplished by including a small inward slope in the footbed.
Most footbeds are made of EVA foam rubber which provides good cushioning. They may also have other materials inset into the EVA base in strategic locations. Often these insets are made of silicone rubber (gel) and help damp the shock together with the EVA footbed.
As with other binding components, the stiffness of footbeds plays a role in the overall responsiveness of a binding. Most are made of EVA so you will have the same general performance. But manufacturers may use EVA of different densities to slightly alter the stiffness and dampening.
Newer designs like Bent Metal’s Flex Control Drive Plates (see Video 1 below) utilize composites to alter the stiffness. This is taking the role of the footbed beyond just cushioning and allowing it to be customized and play a bigger role in the flex and response of the binding.
[tcb-script src=”https://player.vimeo.com/api/player.js”][/tcb-script]
Video 1: Bent Metal’s Flex Control Drive Plates
Generally, a beginner might be better off with a softer footbed since they will be in less control of their body movements. As inadvertent body movements occur these will be absorbed by the footbed better and will not result in quick dramatic movements of the board which may result in catching an edge.
On the other hand, an advanced rider has superb body control, so they may look for a slightly stiffer footbed so that the board does what they want as soon as they make that move. But keep in mind the tradeoff is usually less cushioning.
Decoding the Marketer: OC-Kush
Flow bindings use the term OC-Kush to describe the silicone rubber (gel) inserts that are placed in the heel and toe areas of the footbed EVA base. If you do a Google search for OC-Kush you may or may not find what you’re looking for. But you definitely will not find much if any discussion of snowboard binding cushioning.On Flow’s website, they state, “OC-Kush cushioning dampens landings and absorbs chatter” and “…OC-Kush toe and heel impact inserts for additional comfort.”I am convinced that silicone rubber is great at absorbing and dampening shock but the question is does it result in superior performance and additional comfort over an all EVA footbed?I have ridden Flow bindings with OC-Kush and other bindings without it. I couldn’t tell any difference. When you think about it you have the boot footbed insert, the boot sole, and the large contact area of the EVA underfoot that the shock is transferred through on a big landing before the OC-Kush comes into play.I think the use of silicone rubber would have more impact if it was included in the sole of the boot since it is right up against your foot. So, while it makes for a nice way for the marketer to point out unique design features, and it has a name that many snowboarders may appreciate, it is likely to go unnoticed in terms of how cushiony you feel your bindings are.
Baseplates
The baseplate ties all the components of your bindings together. The Straps, highback, heelcup, and footbed all attach to the baseplate. The baseplate connects your board through the attachment system. Forces and energy are transmitted to the board as you lift, press, and twist your boots in the bindings.
The bindings contact the board through the attachment system but the degree of contact of the rest of the baseplate can be described as the binding footprint. Beyond a basic understanding of the footprint, it is important to consider the relative area of the rigid materials of the baseplate that is directly in contact with the board along with any softer materials that dampen between the hard baseplate and the board.
So why should we care about the binding footprint and contact design?
The reason is board flex. Snowboards are designed to flex under certain loading conditions. They may be stiffened in certain areas compared to other areas of the board to maximize performance in certain conditions like hard turns or Ollies.
The issue is that bindings cover a significant area of the board. And if the bindings just have very rigid material contacting the board it impacts the flex of the board. This situation sacrifices some flex benefits of the board.
The flex allows the board to store up energy to be released during certain maneuvers. For example, if you set up for an ollie or jump take off you are using the flex of your board to store up energy that you release as you take off. If the flex of the board is significantly affected by the bindings, then you don’t have access to all that power.
Another important effect is the responsiveness when making edge to edge turns. If the rigid parts of the bindings are in direct contact with the board then small movements are going to be more quickly transferred to the board.
On the other hand, the flex of the board is less affected if you minimize the surface area of rigid baseplate that is in direct contact with the board. Then most of the energy will be transmitted at the attachment system. The softer materials between the baseplate and board away from the attachment system will not affect the board flex as much and can be customized to control the responsiveness.
Binding Compatibility (Step 4)
Binding compatibility is determined by the design of the attachment system which is how the baseplate attaches to the board. There are two styles including disks or Burton’s exclusive channel system.
Disks are more common. There is a big open hole in the center of the baseplate that has little ridges around the circumference. These ridges mate with ridges on the disk. This allows the angle of the bindings to be set depending on how you like your stance.
The discs have various other holes to accept the screws for different styles of inserts in the snowboard. The holes in the disks are placed to be compatible with different insert patterns on boards. The snowboard has stainless steel inserts that are pressed into the board that the screws fit into. Washers may be required depending on the design of the screw head and disk.
Disc Hole Layout
Disk hole layouts include:
- 2×4: Holes are 4mm apart in the toe to heel direction and 2mm apart in the nose to tail. This design offers more nose to tail stance width and setback options compared to 4×4.
- 4×4: Holes are 4mm apart symmetrically in both toe to heel and nose to tail directions. This design offers less nose to tail stance width and setback options compared to 2×4.
- 3D: These are usually found on kids or lower end boards. They are compatible with smaller bindings with disks designed to be attached with just 3 screws. They also work with 4 screws. But overall, they offer fewer stance options than either 2×4 or 4×4.
Burton’s Channel System
Burton’s channel system uses long continuous channels that accept fasteners that can be moved all along the channel so you have more nose to tail stance options than even 2×4.
The channel system (see Video 2 below) also allows more binding angles too since they are not constrained to only 3 Degree increments like disk systems. The system also allows for a low baseplate contact area which lends itself to good board feel and you should be able to get your foot perfectly centered on the board.
Video 2: Burton’s Channel System
All that adjustability comes at a price though. They may be a little more difficult to consistently set up. If you use one board and never take your bindings off, then there are no concerns.
But in my experience, it takes a bit of effort to adjust the angle, toe to heel centering, and nose to tail stance width and setback all at the same time. So, if you’re going to be swapping bindings between boards a good tip is to take a sharpie marker and trace around the bindings in a few locations. This way next time you put the bindings back on you can use the marks to help you locate your stance quicker.
The other issue with the channel system is compatibility. Since Burton is a big player in the market most binding manufacturers basic disks are either already compatible or they make separate disks that allow adaption to the channel system on their snowboards. But don’t buy Burton channel system bindings for board brands other than Burton. They will not work.
Ok that’s it for the basics (Steps 1 – 4) and you should be ready to start shopping. But if you are looking for more I encourage you to keep reading or use the Quick Navigation below to skip to an earlier section. This will increase your knowledge to get the best understanding of how to choose snowboard bindings which is the more challenging Step 5 from the list at the beginning of this article.
Hardware
Hardware is the term we use to capture the rest of the stuff that makes up binding assemblies and includes all the fasteners, screws, nuts, bushings, and brads that are used to keep the components of your bindings held together.
You should look for stainless steel in critical applications like the screws that hold your bindings to the board and the straps to the baseplate. Stainless steel is superior due to its high strength and corrosion resistance. You don’t want these screws getting corroded and leading to failure. Stainless steel is also high hardness so it stands up to repeated crankings with screwdrivers with less chance of stripping the screw head.
Tool-less Adjustment
Tool-less adjustment is definitely something that falls into the nice to have rather than must-have category. Tool-less means the hardware is designed to allow adjustment to certain components without tools.
Many binding designs allow the strap length to be adjusted for centering on your boot without tools. Bindings from Flux brand allow the rotation of the highback to be adjusted without tools too. I consider these nice to have since you don’t usually adjust these when you’re out on the mountain.
But if they do loosen and you notice it when you’re strapping in it is nice to be able to tighten it again. Otherwise, it might loosen all the way during your ride and you could lose the screw and end up finishing your ride with one strap. Then you need to take a trip to the board shop to get fixed up. But if you maintain and inspect your bindings regularly this should not be an issue.
Rear-Entry (Speed Entry)
So what is different about rear-entry bindings?
Rear-entry bindings are also known as speed entry bindings. They feature a highback that is attached at a pivot point that allows it to be lowered enabling you to step into them from the rear. The primary benefit that you will hear boasted about rear-entry binding designs is that that they are faster to get on and off.
Popular rear-entry snowboard binding brands include Flow, GNU, and K2. Each of these shares a reclining highback but have slightly different design solutions for creating the space to get your foot in/out.
[tcb-script async=”” src=”//z-na.amazon-adsystem.com/widgets/onejs?MarketPlace=US&adInstanceId=c02d12f5-5bb9-47a0-8048-372904a927e1″][/tcb-script]
Flow bindings utilize what they call Active Strap Technology (N.A.S.T.Y.) which is a mechanism that lifts the strap as you lower the highback to create space for you to insert your foot. Then as you raise the highback the strap tightens.
This is a design improvement over Flow’s original system where only the highback rotates but the strap is not actively moving up or down as you raise and lower the highback. So, the Active Strap Technology gives just a little more space to get your foot in and out.
The other unique feature of Flow bindings is the so-called Fusion Powerstrap. This is a single piece strap where the toe and ankle straps are fused together. This helps keep the strap positioned properly to allow you to get your foot in the binding. This strap design rests on top of the foot. It cannot be configured to go over the toe. If you prefer a toe cap strap then Flow’s solution is the Hybrid Powerstrap. This has a more traditional strap that can be placed over the boot cap while it is still fused with the ankle strap.
GNU bindings use more traditional looking straps. The toe strap is a toe cap style. The highback reclines at a simple pivot point. As the highback lowers it activates a special latching mechanism in the ankle strap. When this mechanism activates the ankle strap loosens and pops up quite a bit creating space to remove your foot. Then upon entry, you have a two-step process after you insert your foot. First, you raise the highback. Then you buckle down the latch mechanism. This a simple movement similar to a latch on a trunk or suitcase. Some models have ratchets that allow more adjustments.
To allow the highback to recline low enough both Flow and GNU binding designs have eliminated the heel cup that you’ll find on traditional bindings. And this is actually part of what is different about K2’s design. K2 bindings have a more traditional heel cup. But the whole heel cup pivots down. Then similar to the Flow Active Strap this raises the ankle strap up a bit to make it easier to get into. The K2’s utilize a traditional toe cap style toe strap.
All of these systems are functional in terms of allowing you to enter from the rear. If you are choosing from among Flow bindings then I suggest considering models with the Active Strap Technology over the older version of Flow which does not provide quite as much room to get in and out of.
Another note is that with the K2’s the highback does not recline all the way down flat to allow full rear entry. So, you are really entering from about a 45-degree angle. This doesn’t allow you to kick your boot into the binding during entry. That little extra kick is sometimes needed especially if you have a little snow built up on your binding. So just keep that in mind.
If you’re seriously considering rear-entry bindings then I suggest you check out Rear Entry Snowboard Bindings Pros and Cons for information including the reasons why I switched back to traditional strap-in bindings
Conclusion: How to Choose Snowboard Bindings
Phew! That’s a lot to think about isn’t it?
You’ve learned the basics on how to choose snowboard bindings. Start with understanding your riding style and terrain which will help you settle on a flex rating range (soft/medium/stiff). Then check size and compatibility.
If you’ve made it through the whole article then you’ve also learned much more and you’re well on your way to knowing all there is to know about how to choose snowboard bindings.
Remember: There’s more to your bindings than just keeping you attached to your snowboard!